Hacking Infoblox Discovery for Fun and Profit
It's Just Another CSV
An IPAM solution is not very useful unless it accurately reflects the state of your network. The discovery features in NIOS have always been one of the great benefits of having Infoblox DDI. Network Insight and NetMRI focus on discovery of network gear and what is connected to it. The vDiscovery feature adds the ability to discover virtual infrastructure in both public and private cloud environments. All of these working together can give you a super accurate picture of what exists on your network…if all your gear is supported.
As much as it may seem like it, the discovery features are not magic. Infoblox engineers had to figure out how each supported vendor’s device works and how to query its details. New vendors, new models, and new firmware versions can all affect Infoblox’s ability to properly discover your network gear. In many cases, customers are the ones driving Infoblox to make additions to the support list. But what do you do if you have an unsupported device and can’t (or don’t want to) wait for the formal device support request process?
You could just do it yourself. 😏
Using NetMRI’s Example
Because NetMRI is not part of the NIOS grid, it is a good model for figuring out how to upload our own discovery data from something external. The problem is we don’t really know how it works under the hood. But we have hints from the Audit Log on the grid master.

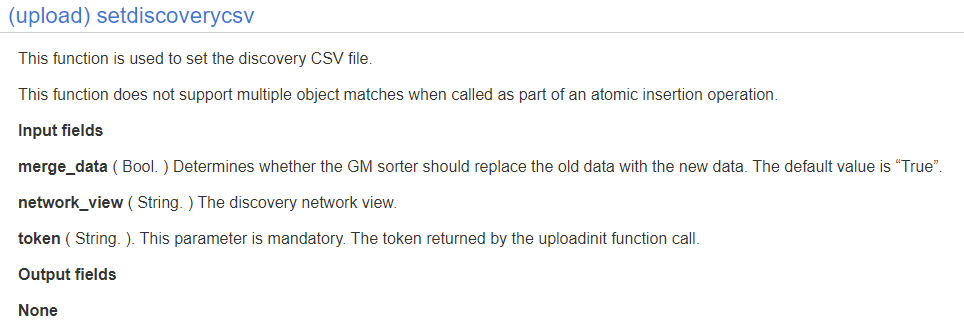
Every time NetMRI submits new discovery data, it calls a DataUploadInit function followed by SetDiscoveryCSV. After searching the WAPI documentation, SetDiscoveryCSV appears to be a standard WAPI function tied to the fileop object type. This is great because anything that can use the WAPI via REST can theoretically submit new discovery data. You can view the WAPI doc on your own grid using the following URL and substitue your own grid master host/IP, https://gm/wapidoc/objects/fileop.html#upload-setdiscoverycsv. Here is a screenshot from my lab GM’s copy.
Now we have to figure out how to format our CSV properly and we should be good to go.
Support Bundle To The Rescue
When I was first looking into this, I was afraid I’d need to do something like MitM the connection between NetMRI and the grid master in order to capture the CSV file being uploaded while it was in transit. Thankfully, that was unnecessary due to Infoblox’s support bundle functionality.
If you have ever created an Infoblox support ticket, you have likely also been asked to generate and attach a support bundle to the ticket. It’s a tar/gzipped file containing a bunch of low-level diagnostic stuff from the appliance it was generated on (log files, config files, etc). It is also a great resource for better understanding Infoblox internals or even trying to solve your own support issues if you have the time and patience.
While poking around in my lab GM’s support bundle, I noticed a folder called /storage/discovery/last_csv_import which looked very promising. It contained another numbered folder likely tied to an internal ID of some sort and within that was a file called import_file.
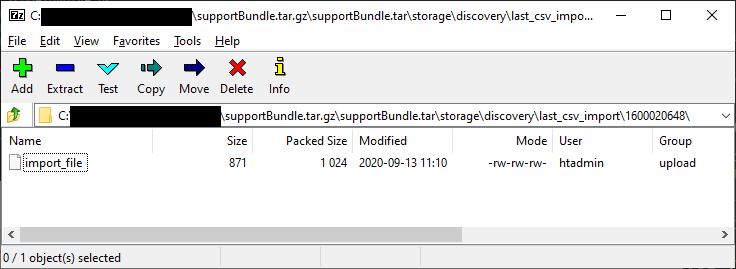
After extracting the file, it appeared to be a complete copy of the file NetMRI had submitted with all column headers intact. 🎉 Hooray! 🎉
CSV Format
Here is a list of all the headers included in the CSV file we pulled from the support bundle:
- ip_address
- ap_ip_address
- ap_name
- ap_ssid
- bgp_as
- bridge_domain
- device_contact
- device_location
- device_model
- device_vendor
- discovered_name
- discoverer
- endpoint_groups
- first_discovered_timestamp
- last_discovered_timestamp
- mac_address
- netbios_name
- network_component_contact
- network_component_description
- network_component_ip
- network_component_location
- network_component_model
- network_component_name
- network_component_port_description
- network_component_port_name
- network_component_port_number
- network_component_type
- network_component_vendor
- os
- port_duplex
- port_link_status
- port_speed
- port_status
- port_vlan_name
- port_vlan_number
- tenant
- vrf_description
- vrf_name
- vrf_rd
- task_name
And here are the contents of the CSV I used as my initial test file. (Stargate fan. Sorry, not sorry)
ip_address,device_location,device_model,device_vendor,discovered_name,discoverer,last_discovered_timestamp,task_name
"192.168.0.9","Dakara","Stargate","Altera","sg01","MyDiscoveryScript","2020-09-14 21:34:18","Stargate_Checks"
Most of these fields correspond to the fields in the discoverydata struct which you can view in your GM’s WAPI documentation (https://gm/wapidoc/additional/structs.html#struct-discoverydata). But there are a few important differences.
ip_address is mandatory in the CSV file but not listed in the struct. The struct has first_discovered and last_discovered which are Epoch seconds, but the CSV uses first_discovered_timestamp and last_discovered_timestamp which are UTC timestamps in yyyy-MM-dd HH:mm:ss format. Everything else seems to be a 1:1 match with the discoverydata struct. So, you can likely add and use additional columns NetMRI doesn’t currently send like fields related to vDiscovery.
The other thing I noticed about the discovery timestamp values is you only need to include last_discovered_timestamp if you are planning to merge the discovery data with existing data. Infoblox will automatically set the first_discovered value based on the last_discovered_timestamp the first time you import data for a given IP. If you choose to replace the data instead, you will need to supply both values or else it will clear the existing first_discovered value.
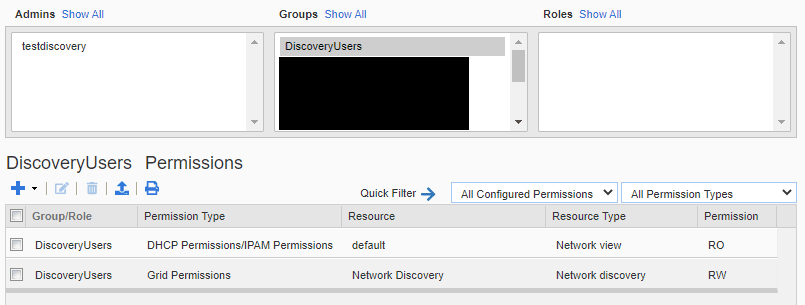
A Word About Permissions
The NetMRI documentation does not really go into detail about the minimum required permissions for the Infoblox user it authenticates to the grid master with. While you could use an existing superuser account, it is not recommended from a security standpoint. Ideally, you would have a dedicated user for discovery data submission. After some trial and error, the minimum permissions you need are:
- Global - Grid Permissions - Network Discovery - Read/Write
- Object - <the network view object> - Read-Only
If you are targeting more than a single network view, you can either add each one individually or just give the read access for “All Network Views”. Here is a screenshot of the resulting permissions in the GUI.
Here is an example of how to create the group, user, and permissions using Posh-IBWAPI.
$groupName = 'DiscoveryUsers'
New-IBObject admingroup -IBObject @{name=$groupName; access_method=@('API')}
New-IBObject adminuser  -IBObject @{name='disco-user1'; password='<the password>'; admin_groups=@($groupName)}
New-IBObject permission -IBObject @{group=$groupName; permission='WRITE'; resource_type='NETWORK_DISCOVERY'}

# For adding read to a specific network view
$viewRef = (Get-IBObject networkview -Filter 'name=default').'_ref'
New-IBObject permission -IBObject @{group=$groupName; permission='READ'; object=$viewRef}

# For adding read to all network views
New-IBObject permission -IBObject @{group=$groupName; permission='READ'; resource_type='NETWORK_VIEW'}
Performing A Test Run
With our CSV file ready to go, we can run the following via Posh-IBWAPI using its super awesome Send-IBFile function. (This assumes you’ve already setup a profile with your discovery user using Set-IBConfig)
Send-IBFile setdiscoverycsv .\discovery.csv -FunctionArgs @{merge_data=$true; network_view='default'}
If you can’t or don’t want to use Posh-IBWAPI, it’s a little more cumbersome because you have to make 3 separate REST calls to follow the standard file upload process with the WAPI. Here’s an example using curl on linux. (If you’re using curl from Windows, you’ll need to escape the JSON differently in the third command)
# This call should return JSON containing "token" and "url" values.
# The url must replace the example URL in the the next command
# The token must replace the token value in the third command (don't include
# the trailing \n if it exists)
curl -k1 -u admin:infoblox -X POST "https://gm/wapi/v2.10/fileop?_function=uploadinit"

# Replace the url using the value returned by the first command
curl -k1 -u admin:infoblox -F name=discovery.csv -F filedata=@discovery.csv "https://192.168.0.2/http_direct_file_io/req_id-UPLOAD-0000000000000001/import_file"

# Replace the token using the value returned by the first command
curl -k1 -u admin:infoblox -X POST "https://gm/wapi/v2.10/fileop?_function=setdiscoverycsv" -H "Content-Type: application/json" -d '{"token":"xxxxxxxxxxxx", "merge_data":true, "network_view":"default"}'
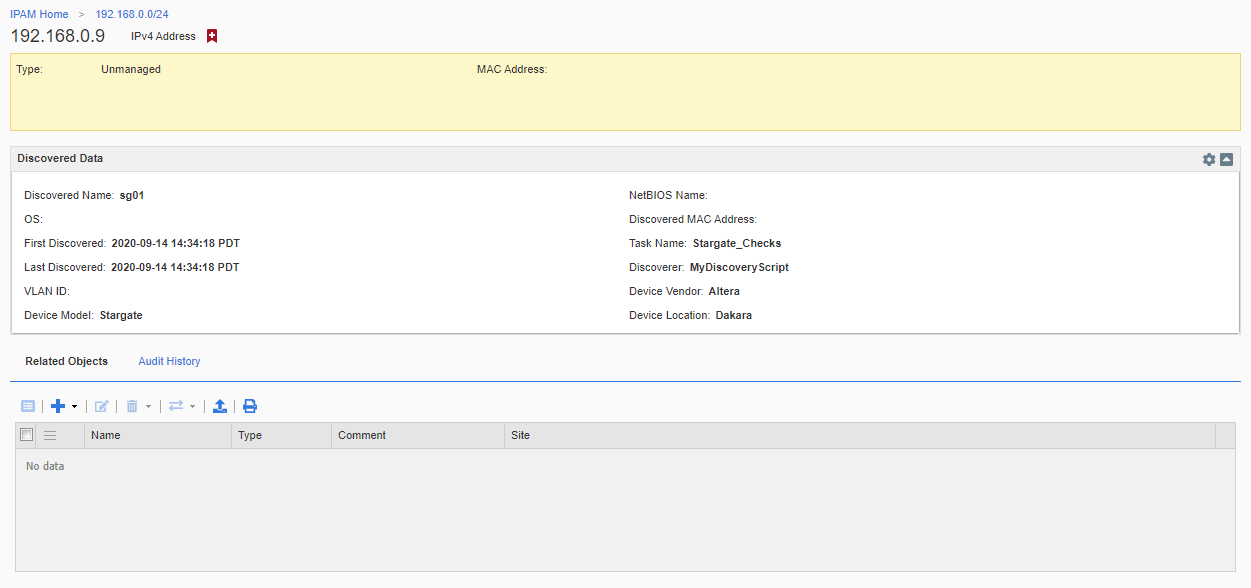
Unfortunately, the WAPI does not return anything useful to indicate the discovery data was processed successfully. You will only get an error if there was a functional problem with the REST call itself. If things worked, you should see your discovery data in the IPAM view for the IP address associated with your discovery data. Mine looks like this from our sample data. (Don’t forget you can customize which fields are shown using the little gear icon in the upper right)
Troubleshooting
If your WAPI call to SetDiscoveryCSV appears to have completed successfully and you do not see your test data in IPAM for the associated IP, the discovery engine may have had a problem parsing your CSV for some reason. The good news is there is a log file that should be able to tell you what is wrong. The bad news is it is buried in the support bundle. Generate and download a fresh one and then look in /infoblox/var/discovery_csv_error for the associated log file.
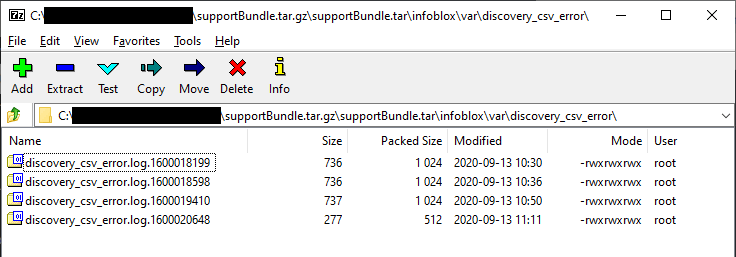
NOTE: My lab grid is on NIOS 8.5.1. Readers have noted separate discovery logs may not exist on previous NIOS versions. If you don’t see them, check the main infoblox.log file for lines containing “discovery_gm_sorter”.
Wrapping Up
We’ve nailed down everything we need to do in order to submit new discovery data. All that remains is writing the tool/script to query our unsupported devices and generate the appropriate CSV file. Now go forth and discover!